6.2.3. The Ext JS Window
Ext JS provides windows with behavior and looks familiar to desktop application developers. The theme for an Ext based application is moderately configurable, though developing custom themes can be labor-intensive. Using Ext windows to display map related information gives your application a well integrated feel if you are using Ext widgets for non-map related parts of your application.
An Ext window can be created with no existing markup. The following code creates a modeless window and opens it.
var win = new Ext.Window({
    title: "Window",
    items: [
        {html: "Hello!"}
    ]
});
win.show();
Ext builds complex elements based on containers with one or more items. The
window above contains a panel element that was created from the string
"Hello!" Using the above technique, windows can be created to display
information about features on your map.
6.2.3.1. Displaying Feature Information in a Window
Tasks
At the end of the previous section, you should have something like the code below in your
map.htmlfile. Open this file in your text editor and confirm the contents are similar to the following:<!DOCTYPE html> <html> <head> <title>My Map</title> <link rel="stylesheet" href="openlayers/theme/default/style.css" type="text/css"> <style> #map-id { width: 512px; height: 256px; } #slider-id { width: 492px; margin: 10px; } </style> <script src="openlayers/lib/OpenLayers.js"></script> <link rel="stylesheet" href="ext/resources/css/ext-all.css" type="text/css"> <script src="ext/adapter/ext/ext-base.js"></script> <script src="ext/ext-all.js"></script> </head> <body> <h1>My Map</h1> <div id="map-id"></div> <div id="slider-id"></div> <script> var medford = new OpenLayers.Bounds( 4284890, 253985, 4288865, 257980 ); var map = new OpenLayers.Map("map-id", { projection: new OpenLayers.Projection("EPSG:2270"), units: "ft", maxExtent: medford, restrictedExtent: medford, maxResolution: 2.5, numZoomLevels: 5 }); var base = new OpenLayers.Layer.WMS( "Medford Streets & Buildings", "/geoserver/wms", {layers: "medford"} ); map.addLayer(base); var buildings = new OpenLayers.Layer.Vector("Buildings", { strategies: [new OpenLayers.Strategy.BBOX()], protocol: new OpenLayers.Protocol.WFS({ version: "1.1.0", url: "/geoserver/wfs", featureType: "buildings", featureNS: "http://medford.opengeo.org", srsName: "EPSG:2270" }) }); map.addLayer(buildings); var slider = new Ext.Slider({ renderTo: "slider-id", value: 100, listeners: { change: function(el, val) { base.setOpacity(val / 100); } } }); map.zoomToMaxExtent(); </script> </body> </html>
To this example, we’ll be adding an
OpenLayers.Control.SelectFeaturecontrol so that the user can select a feature. In your map initialization code, add the following after the creation of yourbuildingslayer:var select = new OpenLayers.Control.SelectFeature([buildings]); map.addControl(select); select.activate();
Next we need to create a listener for the
featureselectedevent on ourbuildingslayer. We’ll create a window populated with feature information when the user selects a feature (by clicking on it with the mouse). In addition, we want to destroy the window when a feature is unselected. We can do this by listening for thefeatureunselectedevent. Insert the following in your map initialization code somehere after the creation of thebuildingslayer:var dialog; buildings.events.on({ featureselected: function(event) { var feature = event.feature; var area = feature.geometry.getArea(); var id = feature.attributes.key; var output = "Building: " + id + " Area: " + area.toFixed(2); dialog = new Ext.Window({ title: "Feature Info", layout: "fit", height: 80, width: 130, plain: true, items: [{ border: false, bodyStyle: { padding: 5, fontSize: 13 }, html: output }] }); dialog.show(); }, featureunselected: function() { dialog.destroy(); } });
Save your changes to
map.htmland open the page in your browser: http://localhost:8082/ol_workshop/map.html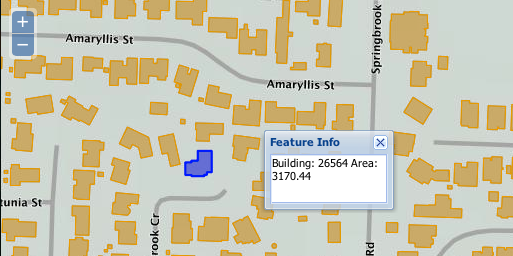
A map that displays feature information in a window.
Bonus Tasks
- Generally speaking, setting element styles in code is bad. Ext allows for
easy style declarations in the component configuration with the
styleandbodyStyleproperties. In addition, Ext makes it easy to set CSS class names for components via theclsproperty. Experiment with adding a class name to the window contents and using declarations in your CSS instead of thebodyStyleconfiguration option above. - Find the
Ext.Windowconstructor in the Ext documentation. Change the configuration of the windows in yourmap.htmlexample to make them modal windows. Your application will not receive browser events until the window is closed.