6.1.2. The jQuery UI Slider
The jQuery UI slider widget creates a draggable handle that can be configured to return a value based on the handle position. Raster layers in OpenLayers provide a setOpacity method that controls the image opacity and accepts values between 0 (totally transparent) and 1 (totally opaque). A jQuery UI slider widget is a user-friendly way to set layer opacity in an OpenLayers map.
A jQuery UI slider can be created with something like the following markup.
<div id="slider-id">
    <div class="ui-slider-handle"></div>
</div>
To give these elements the slider behavior, you would run the following code.
jQuery("#slider-id").slider();
The jQuery function is also exported under the alias $. In the examples below, you’ll see the use of the $ function. This is entirely equivalent to using the jQuery function.
6.1.2.1. Using a Slider to Control Layer Opacity
We’ll start with a working example that displays one WMS layer and one vector layer with features from a WFS.
Tasks
Open your text editor and save the following as
map.htmlin the root of your workshop folder:<!DOCTYPE html> <html> <head> <title>My Map</title> <link rel="stylesheet" href="openlayers/theme/default/style.css" type="text/css"> <style> #map-id { width: 512px; height: 256px; } </style> <script src="openlayers/lib/OpenLayers.js"></script> </head> <body> <h1>My Map</h1> <div id="map-id"></div> <div id="slider-id"><div class="ui-slider-handle"></div> <script> var italy = new OpenLayers.Bounds( 7.7, 39.5, 18.5, 46 ); var map = new OpenLayers.Map("map-id",{ maxExtent: italy, restrictedExtent: italy, }); var base = new OpenLayers.Layer.WMS( "Mosaic", "/geoserver/wms", {layers: "nurc:mosaic"} ); map.addLayer(base); var capitals = new OpenLayers.Layer.Vector("Capitals", { strategies: [new OpenLayers.Strategy.BBOX()], protocol: new OpenLayers.Protocol.WFS({ version: "1.1.0", url: "/geoserver/wfs", featureType: "capitals", featureNS: "http://cartaro", srsName: "EPSG:4326" }) }); map.addLayer(capitals); map.zoomToMaxExtent(); </script> </body> </html>
Next we need to pull in the jQuery resources that our widgets will require. Add the following markup to the
<head>of yourmap.htmldocument:<link rel="stylesheet" href="jquery-ui/css/smoothness/jquery-ui-1.8.14.custom.css" type="text/css"> <script src="jquery-ui/js/jquery-1.5.1.min.js"></script> <script src="jquery-ui/js/jquery-ui-1.8.14.custom.min.js"></script>
The slider widget needs some markup to start with. Insert the following in the
<body>of yourmap.htmlpage, just after the map viewport, in order to create a container for the slider:<div id="slider-id"><div class="ui-slider-handle"></div>
One bit of preparation before finalizing the code is to style the slider container. In this case, we’ll make the slider as wide as the map and give it some margin. Insert the following style declarations into the
<style>element within the<head>of your document:#slider-id { width: 492px; margin: 10px; }Having pulled in the required jQuery resources, created some markup for the widget, and given it some style, we’re ready to add the code that creates the slider widget. In the
<script>element that contains your map initialization code, insert the following to create the slider widget and set up a listener to change your layer opacity as the slider value changes:$("#slider-id").slider({ value: 100, slide: function(e, ui) { base.setOpacity(ui.value / 100); } });
Save your changes to
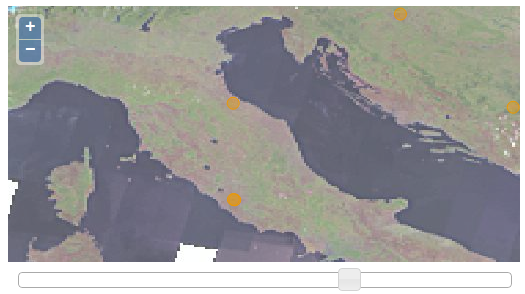
map.htmland open the page in your browser: http://localhost:8082/ol_workshop/map.html
A map with a slider widget to control layer opacity.
Bonus Task
- In the slider jQuery documentation, find the options for the slider function that allow you to specify a number of incremental steps within the slider range. Experiment with adding discrete intervals to the slider range. Modify the end values of the range to restrict opacity settings.
Having mastered the jQuery UI slider, you’re ready to start working with dialogs.