6.1.3. The jQuery UI Dialog
If you are adding a map to a larger website, and you are already using jQuery UI for interface components, it makes good sense to create “popups” for your map that will be integrated with the style of the rest of your site. The jQuery UI dialog function provides a flexible way to produce themeable dialogs that serve a variety of purposes.
The previous example started with existing markup and used the jQuery function to select and modify DOM elements. The jQuery function can also be used to create elements given a string of HTML.
The code below creates a <div> element and turns it into a modeless dialog:
jQuery("<div>Hello!</div>").dialog();
This technique is used in the tasks below to create dialogs populated with information from a feature’s attribute values.
6.1.3.1. Displaying Feature Information in a Dialog
Tasks
At the end of the previous section, you should have something like the code below in your
map.htmlfile. Open this file in your text editor and confirm the contents are similar to the following:<!DOCTYPE html> <html> <head> <title>My Map</title> <link rel="stylesheet" href="openlayers/theme/default/style.css" type="text/css"> <style> #map-id { width: 512px; height: 256px; } #slider-id { width: 492px; margin: 10px; } </style> <script src="openlayers/lib/OpenLayers.js"></script> <link rel="stylesheet" href="jquery-ui/css/smoothness/jquery-ui-1.8.14.custom.css" type="text/css"> <script src="jquery-ui/js/jquery-1.5.1.min.js"></script> <script src="jquery-ui/js/jquery-ui-1.8.14.custom.min.js"></script> </head> <body> <h1>My Map</h1> <div id="map-id"></div> <div id="slider-id"><div class="ui-slider-handle"></div> <script> var italy = new OpenLayers.Bounds( 7.7, 39.5, 18.5, 46 ); var map = new OpenLayers.Map("map-id",{ maxExtent: italy, restrictedExtent: italy, }); var base = new OpenLayers.Layer.WMS( "Mosaic", "/geoserver/wms", {layers: "nurc:mosaic"} ); map.addLayer(base); var capitals = new OpenLayers.Layer.Vector("Capitals", { strategies: [new OpenLayers.Strategy.BBOX()], protocol: new OpenLayers.Protocol.WFS({ version: "1.1.0", url: "/geoserver/wfs", featureType: "capitals", featureNS: "http://cartaro", srsName: "EPSG:4326" }) }); map.addLayer(capitals); map.zoomToMaxExtent(); $("#slider-id").slider({ value: 100, slide: function(e, ui) { base.setOpacity(ui.value / 100); } }); </script> </body> </html>
To this example, we’ll be adding an
OpenLayers.Control.SelectFeaturecontrol so that the user can select a feature. In your map initialization code, add the following after the creation of yourcapitalslayer:var select = new OpenLayers.Control.SelectFeature([capitals]); map.addControl(select); select.activate();
Next we need to create a listener for the
featureselectedevent on ourcapitalslayer. We’ll create a dialog that populates with feature information, when the user selects a feature by clicking on it with the mouse. In addition, we want to remove the dialog when a feature is unselected. We can do this by listening for thefeatureunselectedevent. Insert the following in your map initialization code somewhere after the creation of thecapitalslayer:var dialog; capitals.events.on({ featureselected: function(event) { var feature = event.feature; var point = feature.geometry; var name = feature.attributes.name; var body = feature.attributes.body_value; var output = body + '<br/>Longitude ' + point.x.toFixed(2) + '<br/>Latitude: ' + point.y.toFixed(2) ; dialog = $('<div title="' + name + '">' + output + '</div>').dialog(); }, featureunselected: function() { dialog.dialog("destroy").remove(); } });
Save your changes to
map.htmland open the page in your browser: http://localhost:8082/ol_workshop/map.html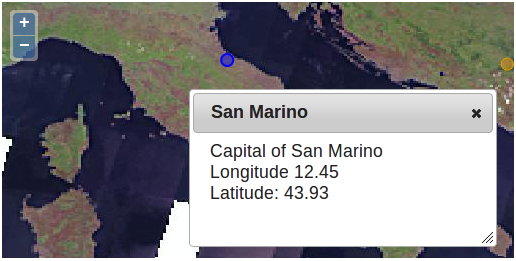
A map that displays feature information in a dialog.
Bonus Tasks
- Find the appropriate dialog documentation to determine how to make the feature dialog with modal behavior. Create a modal dialog for displaying feature information so a user will need to close it before interacting with anything else in the application.
- Experiment with editing the style declarations in the head of the page in order to change the look of the displayed information. You can use the jQuery
addClassfunction to add a class name to an element before callingdialog().